Friday, August 26, 2011

Crab & Sweet Corn Fritters

I guess it should be obvious that I’m a nut for new recipes.  I’m always on the lookout and if I try something at a gathering that’s new to me and delicious, I don’t hesitate to ask for the recipe.  By the same token, I often find recipes in magazines, newspapers, and online.  The Internet is amazing for locating recipes.  I routinely hear from a lot of people who like to cook, especially since starting the TADITK blog.  You’d be amazed at how many adventurous souls there are who, like myself, cruise cyberspace in search of the perfect recipe for whatever they have a hankering.  The problem is, there are not that many perfect recipes out there.  We all have our individual tastes and preferences.  What most of us wind up doing is tweaking.

Now a word of caution:  Tweaking is riskier when baking than when cooking.  Baking is a science.  You have to measure the ingredients carefully, add them in the correct order, even mix them properly.  Think about it.  Cookies and cakes have the same basic ingredients.  It’s how you put them together that makes the difference.  When baking, the oven has to be at the right temperature and certain recipes even call for the proper humidity.  At the bakery, (Latshaw’s Bakery in Spring City, PA, 1882-1974), the oven had steam vents for baking certain types of crusty bread, but forget trying to bake cakes under those conditions.

Cooking, on the other hand, is an art.  A little of this, a little of that…you experiment with combinations of spices and ingredients.  You develop a “feel” for cooking, and rarely...at least less frequently, do things go awry.

So, when I’m cooking, I usually start with several recipes and take what I think is the best from each.  I almost always have a pad and pen nearby on which to write down what I’m using.  And when I forget to write it down, I’m almost always sorry, because invariably I can’t remember what I’ve used by the time the dish is ready to be served.


This week’s recipe is adapted from one I found online at Epicurious.com.  It really caught my eye.  Corn fritters were one of Mom’s specialties when I was growing up, and a love of any type of seafood was cultivated in the restaurant that my grandmother operated adjacent to the bakery.  (We continued to sell raw oysters in the bakery even after the restaurant closed.)  My love of crab, however, was advanced by several trips to my college roommate’s family’s shore house in Ship Bottom, New Jersey.  There I learned to crab.  It was an awesome experience.  I can’t think about it without my mouth watering.  (Eating the crabs, that is, not catching them.)

Corn fritters are kind of a hybrid of cooking and baking.

Now there aren’t too many recipes for crab and sweet corn fritters on the web, so I was kind of locked in.  I pretty much made the recipe as found.  The part that threw me was the ½ cup of cornstarch.  Whaa?  I never heard of using that much cornstarch in anything, but I was a good (baker) boy and followed the published recipe to the letter.  The results were fine.  Alone, the fritters were pretty bland, but again, you have to follow the complete recipe and serve them with sour cream and the sweet chili sauce.  (Don’t forget the splash of fresh lime juice, too.)  When I make these again, I’m going to lose the cornstarch and double the flour, and then add two teaspoons of baking powder.  That’s just how I “feel” about it!

CRAB & SWEET CORN FRITTERS
(click on any image to enlarge it)

Ingredients:
8 ounces of cooked crabmeat (I used claw meat)
2 green onions, thinly sliced
½ teaspoon chili powder
1 Tablespoon chopped fresh cilantro leaves
¼ to ½ teaspoon kosher salt
¼ teaspoon freshly ground black pepper
½ cup all-purpose flour
½ cup cornstarch
2/3 cup cold water
2 eggs, beaten
2 ears of sweet corn, cooked and kernels cut off

For serving:
Sour cream
Sweet chili sauce (available in the Asian section of larger grocery stores)
Lime wedges

Directions:

Place the crab in a medium-sized bowl and break up any clumps or large pieces.  

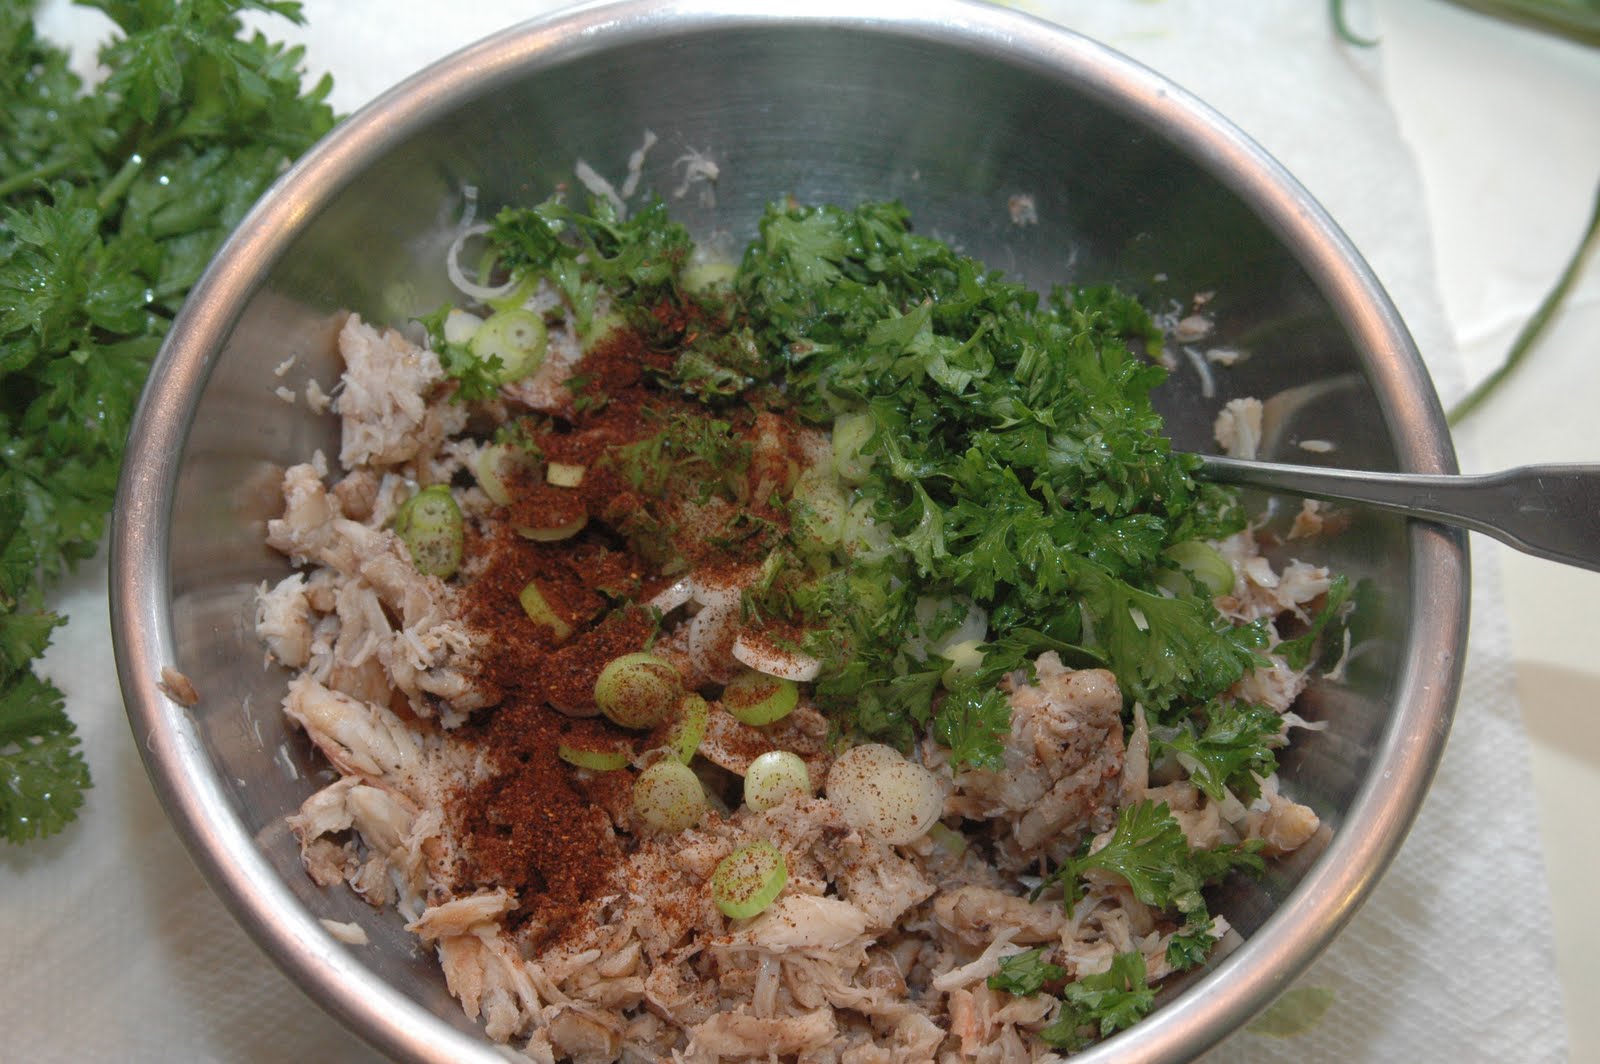
Add the green onions, chili powder, cilantro (parsley can be substituted), salt, and pepper.  Toss lightly and set aside.

Next, cook the sweet corn.  If you have a microwave, you don’t have to prepare a large vat of boiling water.  Shuck the husk off of the ear of corn and remove as much of the tassel a possible.  

Rinse under cold water and wrap each ear in a sheet of waxed paper, twisting the ends closed.  Microwave both ears on high for about 5 minutes.  

When cool enough to handle, cut the kernels off of each ear into a shallow dish.  Set aside.

In a separate bowl, sift the flour and cornstarch, or flour (1 cup) and baking powder (2 teaspoons), if you want to skip right to my proposed “second attempt.”  Add 2/3 cup cold water and the eggs and whisk until smooth.  The mixture should have the consistency of heavy cream.  

Stir in the crab mixture and the sweet corn kernels.

The original recipe called for cooking the fritters on a griddle over your outdoor grill.  That was just a little to risky for me.  I used my electric frying pan set to 350°.  Lightly grease the cooking surface with about a Tablespoon of oil.  You can distribute the oil with a spatula or a paper towel. 

Spoon batter onto griddle and cook for 3 minutes on each side, or until golden brown.  After flipping, you may want to lightly press down on the fritter in order to make good fritter to griddle contact.  (I’ll bet those words have never been put together before!)  This recipe made twelve 3” fritters.

As I said before, eating the plain fritters will disappoint you as they’ll be bland.  However, some sour cream (or crème fraiche), some sweet chili sauce, and a spritz from a wedge of lime will take them over the top.  You can garnish with sprigs of cilantro, too.  Leftover fritters reheated fairly well in the microwave.


“NORMAL” CRAB CAKES

There are about as many recipes for crab cakes as Carter has liver pills, (or however that saying goes).  Here’s mine.  Simple…easy…and delicious.  I favor crab cakes with more crab and less filler.  This recipe calls for just enough panko or bread crumbs and eggs to hold the crab together, (although one egg would have probably been enough).  If you bake or broil your crab cakes, you can get away with less ingredients that serve as a binder.

Ingredients (makes 6 crab cakes):
8 oz. cooked crabmeat
½ teaspoon Old Bay Seasoning
2 Tablespoons fresh parsley, chopped
¼ teaspoon Kosher salt
¼ teaspoon freshly ground black pepper
½ cup panko breadcrumbs (or regular breadcrumbs)
1 or 2 eggs, slightly beaten

Directions:
Combine all ingredients in a medium bowl and toss until well blended.  Spoon mixture onto surface of lightly greased cooking surface.  If necessary, form into circular cakes with a spatula.  Cook for 3 minutes on each side, or until golden brown.  Serve with cocktail sauce. 

Enjoy!

Friday, August 19, 2011

Peach Cobbler


About three weeks ago, I had the honor of being asked to say a few words at the rededication of the World War I memorial in Royersford’s Victory Park.  Kyle Thorpe, aspiring for scouting’s highest rank, had restored the monument for his Eagle Scout project.  It was a great day to give tribute to those who served in "The Great War," especially those who made the ultimate sacrifice.  Most people are unaware that there is no national memorial for WWI.  The only recognition for these individuals can be found in small town and borough monuments across our country.  Congratulations to Kyle and the other scouts who assisted him in successfully completing this project!  (Click here for Limerick-Royersford-Spring City Patch coverage of the rededication.)
The rededication was not only a great day for remembering WWI servicemen and women.  It was also a great day for remembering my own participation in Boy Scouting.  I never made Eagle, attaining the second highest rank of Life, but I have carried the experiences I was provided and the lessons that I learned with me all my life.  Some are comical.  For example, did you know that if you confuse instant milk with instant mashed potatoes when making hot chocolate, you’ll get chocolate mashed potatoes?  (Of course there was someone in our troop who thought they were great.)

Other experiences had a more profound and lasting effect in my life, such as the opportunities for leadership.  I wonder if the adult leaders of the troop understood to what extent their lives were held in our hands when they permitted us to plan and prepare the meals for a weekend-long camping trip.  I also produced a monthly newsletter for our troop, honing early (and primitive) writing skills.  I recall strong feelings of accomplishment after surviving the Order of the Arrow Ordeal and upon completing the Mile Swim…twice.  In fulfilling the Order of the Arrow, I agreed to the following:  “I do hereby promise on my honor as a Scout that I will always…regard the ties of brotherhood as lasting, and will seek to preserve a cheerful spirit even in the midst of irksome tasks and weighty responsibilities, and will endeavor, so far as in my power lies, to be unselfish in service and devotion to the welfare of others.”  I had no real idea of what I was agreeing to in signing that.  But as in the case with most quality youth programs, seeds well-planted more often than not, bear fruit.

Photo credit:  Dirty Gourmet
Soon after I started There’s a Dad in the Kitchen, I received a comment from long-time friend and fellow scout, Jack Neborak.  In response to a dessert recipe, Jack wanted to know when I was going to post a recipe for peach cobbler like my dad used to make on our scout camping trips.  That memory also took me back.  I remember it so clearly.  We used canned peaches and Bisquick.  The fire was readied, until only red-hot coals were remaining.  We used a cast iron Dutch oven to bake in.  To provide an air space under the pan so the bottom of the cobbler wouldn’t burn, three small stones were placed on the floor of the Dutch oven, and the pan with the unbaked cobbler was placed on top of them.  The lid was put into place and coals were heaped on top.  The Dutch oven was then nestled in a bed of more coals.  There was no checking on the progress of the cobbler as it baked.  That would blow ash inside, providing more fiber, but certainly less appeal.  (With cobbler you couldn’t say the ash was pepper.)  After about an hour, it was do or die.  The coals would be swept off and the lid removed, to find…simply the best possible concoction you would ever hope to eat on a weekend scout camping trip.

Peaches are in season.  It is time to make the cobbler!

I had fun researching peach cobbler recipes.  Most are more of a crisp or crunch-style compared to what I remember.  This recipe, from Betty Crocker, uses fresh (of course) peaches and calls for cobbler dough made from scratch.  Use Bisquick if you must, but this is almost as easy to make, and in my opinion, much better.

You've got to start with good peaches.  Mine came from two sources:  Renninger's Farm and The Farmer's Daughter Farm Market.  I thought I had enough with one stop, but several disappeared before I could make the cobbler.  Hmmmmmm....

PEACH COBBLER
(Click on any image to enlarge it)

Ingredients
For the peaches:
4 cups sliced fresh peaches (approx. 6 med. Peaches)
½ cup sugar
1 Tablespoon cornstarch
¼ teaspoon ground cinnamon
1 teaspoon lemon juice

For the cobbler dough:
3 Tablespoons shortening
1 cup all-purpose flour
1 Tablespoon sugar
1½ teaspoons baking powder
½ teaspoon salt
½ cup milk

Serving suggestions:  Serve warm with cream, milk or ice cream

Directions:

Preheat oven to 400°.  

The first step is to peel and slice the peaches.  In researching peach cobbler recipes, I came across a fantastic way to peel peaches.  It’s similar to the method used for peeling red beets that I described in a previous post.  To easily peel fresh peaches, dip the peaches into a saucepan of boiling water.  Allow the peaches to remain submerged for one minute.  
The skins will then effortlessly slip off.  Use your fingernail, or a paring knife to start, or just use your hands to rub the skin off.  The best part is that only the skin comes off.  You don’t lose any peach flesh by using this technique.  Cut each peach in half and remove the pit.  Slice the peaches into thin wedges.

Okay, I know you're not supposed to show the mess when posting a
recipe, but there is no neat way to peel, pit, and slice six peaches.
Be Prepared!...which is also the Boy Scout motto.
Mix ½ cup sugar, the cornstarch, and cinnamon together in a 2-quart saucepan.  Stir in the peaches and lemon juice.  

Heat over medium heat, stirring constantly, until the mixture thickens and boils.  Allow to boil for one minute.  

Pour the peach mixture into an ungreased 2-quart casserole, and keep the peach mixture hot in the oven.

To make the cobbler dough, combine the flour, 1 Tablespoon of sugar, the baking powder, and salt in a medium-sized bowl.  Cut the shortening into the flour mixture using a pastry blender, or use two forks.  Blend until the mixture looks like fine crumbs.  

Stir in the milk until thoroughly moist.  

Drop the dough by 6 spoonfuls onto the hot peach mixture.

Bake 25-30 minutes or until topping is golden brown.  Serve warm with cream, milk or ice cream.  (It’s delicious plain, too!)

Enjoy!

Thursday, August 11, 2011

Chili with Hidden Zucchini


It’s official.  The Attack of the Zucchinis continues.  They are stacking up like cordwood.  Gardening neighbors are getting that frantic look in their eyes, and you’re beginning to stay indoors more than normal, using the excuse that it’s too hot to go outside.  There is only one solution:  You’re going to have to try hiding them.

At the same time, you want your kids to eat more vegetables, right?  Hmmmm….  Could there possibly be a connection point, here?

I never knew it as a kid, but it was years later I discovered that I had been deceived by my own mother’s “Golden Mashed Potatoes.”  They were actually potatoes with mashed carrots hidden in them!  Rofo Mom has started making “Faux-Tatoes” with cauliflower, and thinks nothing of the con that she is perpetrating on her unsuspecting children.  (She later confessed.)  My friend, Marge, told me about one of her clients who sneaks zucchini into anything tomato-based, as her husband will only eat green beans and corn…knowingly.  So it’s not just to trick children into eating more veggies.  But I ask you, can this be any basis on which to build a marriage?

Why not?  What else are you going to do with those zucchinis?

Chili seemed like a good option to me for a subversive attempt.  I figured that between the spices and the tomatoes, the zucchini would just…disappear.  I was right.

Here is my chili recipe with a little something “extra.”  For suggestions for freezing zucchini for winter use, see the end of this post.

CHILI WITH HIDDEN ZUCCHINI
(Click on any image to enlarge)

Ingredients:
1 to 1½ lbs. ground beef (80% lean)
½ green bell pepper, chopped
2 medium onions, chopped
6 plum tomatoes, chopped or 1 can diced tomatoes
2½ cups shredded zucchini
1 (6 oz.) can tomato paste
1 (15 oz.) can crushed tomatoes
3 Tablespoons paprika
1 Tablespoon ground cumin
2 Tablespoons dried oregano
½ teaspoon red or cayenne pepper
½ teaspoon garlic powder
1 can pinto beans*
1 can black beans*
Kosher salt and ground black pepper to taste

Serving suggestions:  Serve over rice or mashed potatoes; top with shredded cheese.

Directions:
Prepare the green pepper and onions by chopping.  Brown the ground beef and sauté the green pepper and onion all at the same time.

While they are cooking, prepare the plum tomatoes by cutting off the tops, halving them, removing the center core and the seeds, and chopping them, (or just use a can of diced tomatoes.)

Before adding the chopped tomatoes, drain any fat from the ground beef mixture.  (Remember my “trick” for doing this when using an electric frying pan.)  Reduce heat when onion and pepper begin to get tender.

Next, remove about half of the skin from a medium-sized zucchini using a vegetable peeler.  Shred the zucchini using a hand or box grater.  You may want to halve or quarter the zucchini length-wise so that the shredded pieces aren’t too long.  That could tip your hand!

Add the shredded zucchini to the beef mixture and continue to sauté, allowing the liquid coming from the zucchini to mostly cook off.

Incorporate the zucchini into the meat mixture, distributing it evenly to both allow it to cook as well as vanish.

Add all spices and stir thoroughly.  Two tablespoons of oregano seems like a lot, but it too...disappears.  The ground cumin is critical for that chili flavor and aroma.  (The zucchini is already starting to disappear!)

Next, add the tomato paste and incorporate it until it is well distributed.   Add the crushed tomatoes and stir until well blended.  Add salt (about ½ teaspoon) and ground black pepper (about ¼ teaspoon, or more), to taste.

*Many people do not want beans in their chili.  If that’s the case for you, you can stop here, but plan on adding a little more crushed tomatoes or some chicken or beef broth.

The title picture for this post was taken before the beans
were added.  Here is the chili with black & pinto beans,
but where is the zucchini?
If you like chili with beans, add 1 undrained can each of pinto beans and black beans.  Simmer until thoroughly heated and the desired consistency is attained.  Add more crushed tomatoes (or broth or water), if too thick; add instant mashed potatoes (or more shredded zucchini), if too thin.

The final result had a smooth texture and was very filling.  It seemed to need a little more salt than normal, but that could have been my imagination.  I grated the whole diameter of the zucchini.  As a result, there were some strands of zucchini hanging from my spoon.  They could have been mistaken for pieces of onion, but take my advice and grate the zucchini finer by quartering it length-wise.  Otherwise, you could get caught!

This chili is what I would call “medium hot.”  That means that you’ll still have a tingle on your lips when you’re finished eating.  That would gain the approval of my family, but you’ll want to adjust the amount of cayenne pepper to match your family’s level of tolerance.

FREEZING ZUCCHINI

Amy Renninger Hellauer, (of the Renninger's Farm Renningers), offered several suggestions for freezing zucchini that she found in the Ball Blue Book Guide to Preserving.  The zucchini should not be peeled.  The procedure is pretty simple and straightforward:  wash, slice (1/4" to 1/2" thick), blanch for 3 minutes, drain, cool, bag, seal, label, and freeze.  If you've never blanched anything before, that means plunging the fruit/vegetables into boiling water for the specified time and then plunging the produce into an ice bath to immediately stop the cooking.  Blanching as a method of cooking that preserves the color and crunch of the vegetables.  When freezing produce, blanching halts the ripening enzymes so that the fruit or vegetables can be kept longer, even in the freezer.  Know that most frozen vegetables and fruit will not be crunchy when thawed after being frozen.  They are therefore better used in stews, soups or other cooked foods, (as opposed to trying to serve them raw).

If you wish to freeze shredded zucchini for recipes like the chili in this post, you should use steam blanching.  Use either a saucepan that comes with a steaming insert or use a steaming basket that fits into one of your pans.  (I described steaming equipment in a past post that included a recipe for glazed carrots.)  Place the shredded zucchini in the steaming basket, just covering the bottom.  Steam for 1 to 2 minutes, until the zucchini turns translucent.  Allow the zucchini to cool before placing in freezer bags.  You can also place the zucchini in bags and immerse the bags in ice water to cool them.  Not cooling the zucchini will result in it clumping together when frozen.  Zucchini will keep 8-12 months in the freezer.  Stay tuned for a future post on freezing other vegetables and fruit.

Thursday, August 4, 2011

Blueberry Bread Pudding


This is truly a “left-over” recipe, as it includes surplus French Toast from the congregational breakfast at Parker Ford Church that my fellow “dads in the kitchen” and I prepared in mid-June.  I froze some of the leftovers as I had an idea for what to do with them…when the local blueberries arrived.

Jane Sabbi and I worked together at Royersford Elementary School.  She is an instructional assistant, but more importantly an amazing cook…especially in the area of baking.  Her cakes are legendary.  In fact, they are referred to as “Jane Cakes.”  She shares recipes, but don’t ask her for her pound cake recipe.  You won’t get it.  Jane is incredibly accommodating, generous, and giving…but not when it comes to that recipe.  You can just forget about it, although I have considered waterboarding.

Here is an adaption of her bread pudding recipe.  It was great served warm, drizzled with a little lemon-flavored glaze. 


BLUEBERRY BREAD PUDDING
(Click on any image to enlarge it.)

 Ingredients:
5-6 slices of leftover French toast (Use toasted, buttered bread if you don’t have leftover French toast)
4 eggs
½ cup sugar
½ teaspoon salt
¼ teaspoon ground cinnamon
½ to 1 cup of fresh blueberries


To sprinkle on top before baking:
2 Tablespoons sugar
½ teaspoon ground cinnamon

Lemon Glaze:
1 Tablespoon milk
1 teaspoon lemon juice
½ cup confectioners sugar

Directions:

Preheat oven to 350°.

Cut the French toast into cubes and arrange in a baking dish coated with non-stick cooking spray (or butter).  The leftover French toast I used had been made with thick-sliced Texas toast bread, so there was plenty.  

Add the blueberries.  Then, in a separate mixing bowl, beat the eggs with ½ cup sugar and ½ teaspoon of salt.  Add a little ground cinnamon.  Pour this mixture over the cubed bread, making sure all is covered.  Allow to stand for 5-10 minutes.

Mix 2 Tablespoons of granulated sugar with ½ teaspoon of ground cinnamon and sprinkle over the top.  

Just out of the oven.  Delicious!


Bake in 350° oven until an inserted knife comes out clean, (approximately 30-45 minutes).  Serve warm with a lemon glaze drizzled on top.

Directions for Lemon Glaze:

Lightly whisk milk and lemon juice.  Add ½ cup confectioners sugar, a little at a time, until thoroughly blended.  If too thin, add another teaspoon of powdered sugar.

Enjoy!