Monday, February 13, 2012

Cooking Class at Sur la Table


Seared Scallops in White Wine Cream Sauce
(Sauce Noix de Saint Jacques)

My attempt...see below for the Sur la Table version
It’s a great day when you get the perfect gift.  I’m not talking about the gift that you’ve dropped hints for starting with last year’s birthday.  I’m talking about the gift you receive that would be what you’d buy if you were going to treat yourself, but probably wouldn’t.  It’s the gift that comes when someone knows you so well that they spend time thinking about what would match your passion.  That’s the true gift.  It’s the thought that goes into figuring out the perfect gift.  And it’s that thought that is sometimes more of the gift than the actual gift.  People often say, “It’s the thought that counts,” when they receive a less-than-perfect gift.  But the thought…the thought, to me at least, really makes it.

Oliver (my daughter's dog) reacts to the flames in picture one
and then "warms up" to them when he realizes
there's cake to be had!
Such was the case on my last birthday.  After we had enjoyed fantastic Mexican at Casa Toro in Coopersburg, PA, my two children and their spouses handed me a clasp envelope.  Inside were some calendars and brochures as well as a gift card to Sur la Table in King of Prussia.  The idea was for me to take a cooking class.  Was that the perfect gift, or what?

It was difficult to select which course to sign up for.  Sur la Table offers dozens, and you can hardly find a day on their calendar on which a course or two isn’t listed.  Most are offered at night and most cost in the neighborhood of $70.  A typical class includes two full hours of instruction, and you get to eat the food that you prepare!  I chose Classic and Contemporary Sauces as sauces is an area in which I have limited experience.

On the night of the class, I reported to the demonstration kitchen, located at the rear of the store, and donned an apron and nametag prepared for the five students who would be taking the class.  That was a great class size, and most Sur la Table classes are capped at 20.

Chef David Kinsey was our instructor for the evening, and I appreciated his straightforward and positive approach.  It was easy to tell that this is someone who has a passion for what he does, and he loves sharing it.  The most appreciated aspect of the cooking class experience was that David is a teacher.  There are too many people, while unquestionably passionate about their subject, lack the ability to teach it.  As a former principal, I found myself mentally critiquing David’s instruction and he got top marks.  The information was presented methodically and sequentially.  He was also affirming and inspired confidence.  It's always great to make connections with folks, too.  During our evening together I learned that David is a Spring-Ford alumni and was initially trained by Dean Soltes, who continues to instruct in the culinary arts at the Western Montgomery Career and Technology Center.

Celery Root Salad with Herbed Remoulade and Thyme-
Roasted Chicken Thighs with Fig Gastrique
The dishes we prepared were a full meal, starting with a Celery Root Salad with Herbed Rémoulade.  There were two main courses; Thyme-Roasted Chicken Thighs with Fig Gastrique and Seared Scallops in White Wine Cream Sauce (Sauce Noix de Saint Jacques).  For dessert, Homemade Butterscotch Sauce with Guinness Stout Ice Cream.  (We were supposed to have plain old vanilla, but the Guinness Stout Ice Cream was left over from another class David had taught.)

Since the class, I’ve only tried one of the recipes on my own, and I’m not going to try and provide all four in a single post, so let me offer a photo essay of the experience, along with my attempt at the scallop dish.

All of the ingredients for each recipe were portioned and prepared in advance for us.
We felt like TV chefs!  (These are the ingredients for the Herbed Remoulade.)
The mark of a true chef; the ability to tell if something is right by
simply taking a whiff.  Not pictured, we used a kitchen mandolin to
julienne the celery root and carrots.
Here is a shot of the rear of the demonstration kitchen.  In addition to
Chef Kinsey, there were two assistants who keep us supplied with ingredients
and who cleaned everything up.  Like I said, we felt like TV chefs!
Here are the thyme-roasted chicken thighs, along with some fingerling
potatoes.  Normally, this would have been the finished product for me.  However,
serving them with the fig gastrique provided a flavor explosion.  My
mouth waters every time I think of this recipe.
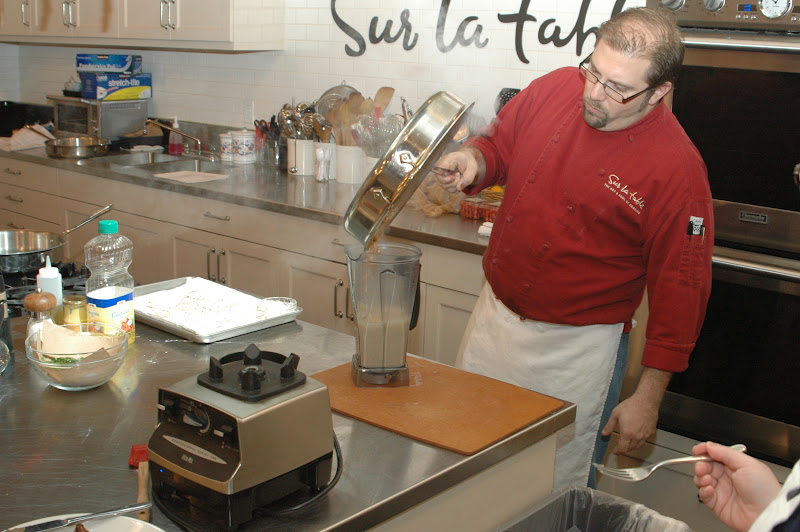
Chef Kinsey pours the beginnings of the white wine cream sauce into a blender.
The sauce is finished with additional white wine and thickened with corn starch.
The scallops recipe follows at the end of this post.
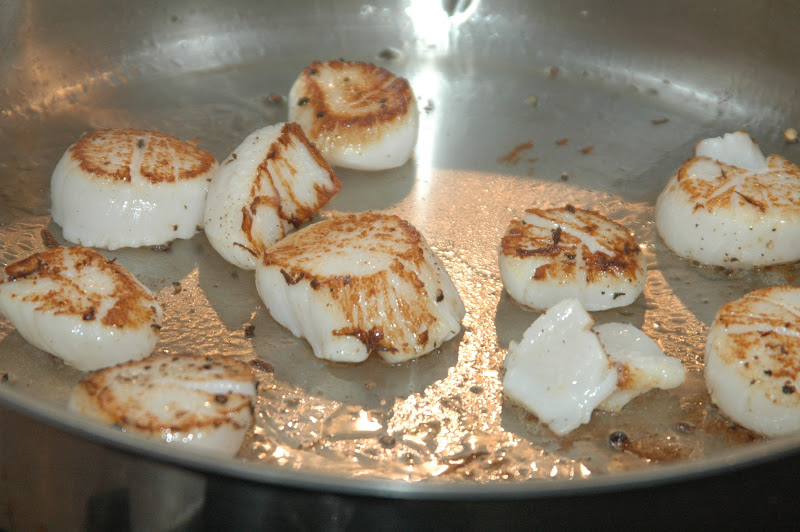
Aren't these beautiful?  Compare to mine, below.  Most cooks are reluctant to
have the pan hot enough to sear the flavor in and brown correctly.  I tried,
but obviously, I'm still learning.
These are mine at home.  Browning, but not quite enough.  Like I said, I'm still learning.
Here Chef Kinsey pours the pureed cooked scallops into thickened white wine
to finish the sauce.  It smelled so good!
A little final simmering and it was ready to pour over the plated scallops.
Absolutely delicious!

SEARED SCALLOPS IN WHITE WINE CREAM SAUCE
(Sauce Noix de Saint Jacques)

Ingredients:
2 Tablespoons unsalted butter, divided
36 bay scallops, divided  (Chef Kinsey had us use about 12-15 small bay scallops to make the sauce and then used larger sea scallops to sear and serve with the sauce.)
Kosher salt and freshly ground black pepper
2½ cups muscadet or other light, dry white wine such at Pino Grigio, divided
2 cups fish stock
¾ cup heavy cream
1½ Tablespoon cornstarch
3 Tablespoons minced flat-leaf parsley

Directions:
Melt 1 Tablespoon of the butter in a large skillet over medium-high heat.  Season 12 of the scallops with salt and pepper to taste.  Cook scallops in skillet until golden brown on both sides, about 4-5 minutes; transfer to plate.

Add 2 cups of the muscadet and 2 cups of the fish stock to skillet; cook until reduced and thickened, about 20 minutes.  Pour liquid into a blender; puree along with the previously cooked scallops and heavy cream.  For the fish stock I used 2 cups of instant miso, which is a Japanese fish soup.

Whisk together remaining ½ cup of the muscadet and cornstarch in skillet, remove from heat.  Add scallop puree; cook over medium heat, whisking constantly until thickened, about 4-5 minutes.  Keep warm.

Melt remaining 1 Tablespoon of the butter in another large skillet over medium-high heat.  Working in batches, cook remaining 24 scallops until golden brown on both sides, about 4-5 minutes.  To serve, divide scallops between your serving plates.  Ladle the cream sauce over the scallops, garnish with parsley and serve.  Serves 8.

Stay tuned for the other recipes from the Sur la Table class in future Dad in the Kitchen posts.  Enjoy!


Sunday, February 5, 2012

Award-Winning Chocolate Chip Cookies


It’s hard to improve on perfection.  In the U.S.A. we try.  You know, the whole “better mousetrap” idea.  But there are some things that are better left “original.”

That fact was recently reconfirmed at the Pennsylvania Farm Show.  The 96th Farm Show was held in early January at the Farm Show Complex and Expo Center in Harrisburg.  The show boasts 10,000 competitive exhibits, 300 commercial exhibits, and 6,000 animals.  Into that mix enters thirteen-year-old Christopher Mrozinski.  Christopher is the son of Michael Mrozinski and former Spring-Ford teacher, Paige Menton.

Christopher, who is a future “Dad in the Kitchen,” I’m sure, loves to bake.  He also loves 4-H, and is involved with Montgomery County 4-H in Creamery, PA.  That combination inspired him on the night before the Farm Show to bake a batch of chocolate chip cookies.  He got the recipe from the package of chocolate chips.  You guessed it:  Nestlé Toll House® Chocolate Chip Cookies.  An American Original.

That’s not all.  In fact, here’s the best part:  He won a prize.  In fact, First Place in the Youth Section of the Food and Nutrition competition of the Family Living Department!  Way to go, Christopher!  Christopher’s family screamed with delight upon learning of the win, and his first official act as First Prize Winner was to call his grandmother and share the good news.

Christopher also won Third Place for his Double-Peanut Butter Cookies.  That recipe is not quite as well known, and came from Kids Cookies, a volume of the Williams-Sonoma Kitchen Library.  I’ll share that recipe in a future post.

Christopher can’t wait for next year’s Farm Show.  He plans to enter in as many categories as possible.  Christopher’s award-winning Toll House Cookie recipe follows, but first the story of how the chocolate chip cookie came to be.

Nestlé Toll House® Logo
In the 1930’s Kenneth and Ruth Wakefield purchased an old toll house in Massachusetts.  Dating to the beginning of the 18th century, the house had originally been a place for weary travelers to enjoy a home-cooked meal, change horses, and of course pay the road toll.  The Wakefields decided to open a lodge and call it the Toll House Inn.  Ruth baked for the guests who enjoyed meals at the inn.

Ruth Wakefield
According to Ruth, (as told by Nestlé), the inauguration of the chocolate chip cookie occurred when she was making her popular Butter Drop Do cookies and ran out of regular Baker’s Chocolate.  She substituted broken pieces of Nestlé Semi-Sweet Chocolate, expecting them to melt.  Instead the chocolate held its shape but softened to a creamy texture, and the legend was born.

The genesis of the Toll House Cookie is not without controversy, however.  Wikipedia includes a story from the point of view of George Boucher, who was at one time the head chef at the Toll House Inn.  Boucher disagrees with Nestlé’s claim that Ruth Wakefield put chunks of chocolate into her cookie dough thinking they would melt.  He contends that she was an accomplished baker, familiar with the properties of chocolate, and knew the chocolate wouldn’t melt and mix into the cookie dough.  Boucher says that the vibrations from a large Hobart mixer dislodged bars of chocolate stored on the shelf above, causing them to fall into the mixer and become broken up and distributed into the dough.  Boucher is the hero (of course) in this version, as he convinced Ruth not to discard what she considered to be “ruined cookie dough.”  The rest, as they say is “history,” at least according to Chef Boucher.

Hobart Floor Mixer
My dad used Hobart mixers at Latshaw’s Bakery, and I have to say that it would be almost impossible for chocolate bars to fall into their mixing bowl.  Almost all of the open surface of the bowl is shielded by the mixer’s top, which contains the motor and gearbox.  That top is also rounded and would have a tendency to deflect anything falling above it.  I’m therefore a little skeptical of Boucher’s version.

In any case, the new cookie quickly became a sensation in Massachusetts and Ruth readily shared her recipe.  It's popularity spread quickly, but got a surprise boost.  During WWII, GIs from New England who were stationed overseas shared the cookies sent to them in care packages.  Soon hundreds of GIs were writing home asking relatives to send some Toll House Cookies.  Nestlé started marketing chocolate morsels so that home bakers wouldn’t have to break chocolate bars to make their own…and they wanted to print Ruth Wakefield’s recipe on their packaging.  She struck a deal with Nestlé and as part of the agreement Ruth received all of the chocolate she could use to make Toll House Cookies for the rest of her life.

On that happy note, here is the award-winning recipe from Christopher, a half-recipe, adapted from the Nestlé semi-sweet morsels package.  It makes 18 large cookies:

Nestlé Toll House® Chocolate Chip Cookies


Ingredients:
1 cup plus 2 Tbsp. all purpose flour
½ tsp. baking soda
½ tsp. salt
½ cup (1 stick) butter or margarine, softened
½ cup packed brown sugar
 1/3 cup granulated sugar
½ tsp. vanilla extract
1 large egg
1 cup (6-oz.pkg.) semi-sweet chocolate morsels
½ cup chopped nuts

Directions:
Preheat oven to 375°.
Combine flour, baking soda, and salt in small bowl. Beat butter, brown sugar, granulated sugar and vanilla extract in large mixer bowl until creamy. Beat in egg. Gradually beat in flour mixture. Stir in morsels and nuts. Drop by rounded tablespoon onto ungreased baking sheets. Bake for 9 to 11 minutes.

When I made Christopher’s recipe, I decided to try using my food processor to make the dough.  It worked well, but I think I prefer my Kitchen Aid mixer.  The food processor required a lot of stopping and scraping that the mixer does not.

I also decided to add the chocolate chips by hand, and left out the nuts.  The dough was satiny smooth and the cookies were great!

I used parchment paper on my cookie sheets.  Dad always used parchment for baking.  It helps the cookies bake evenly and clean up is so much easier.  You can find parchment paper in the grocery store’s wax paper and aluminum foil aisle.

Congratulations, Christopher!  Keep us posted on your future baking successes!

Friday, January 27, 2012

Easy & Really Easy Chicken Parmesan


So did you know it’s really not Chicken Parmesan?  (Collective gasp.)

That’s right!  The correct name is Parmigiana, and that’s not the Italian spelling for the cheese.  It’s a short form of Parmigiana di melanzana, which is the name of a Southern Italian dish.  "Parmigiana" means the way it's prepared.  The three most popular versions, as you already know, are eggplant (the oldest version, melanzana), veal (vitello), and chicken (pollo).  Each is shallow-fried and then layered with tomato sauce and cheese. 

In looking at a number of recipes online, even the Food Network calls it “Parmesan,” and then they try and throw some grated Parmesan cheese on it to justify the name.  Personally, I prefer not to top the Mozzarella on mine with grated Parmesan, but as Francesco Rinaldi always said, “It’s in there!”  (You'll see what I mean.)

This version was always a popular dish with the kids.  In fact, it’s been requested, so I’d better get cooking!

EASY CHICKEN PARMESAN

I have never written this recipe down, and have always just made it, so feel free to improvise.  This is how I made it this time.

Ingredients
6 boneless, skinless chicken breasts

For the breadcrumbs:
1 cup unseasoned breadcrumbs (I’ve also used the Italian seasoned ones)
2 Tablespoons grated Parmesan cheese
1 Tablespoon oregano
1 Tablespoon dried parsley flakes
1 teaspoon dried basil
½ teaspoon ground black pepper
¼ teaspoon sea salt (regular salt is fine)

2 eggs, beaten
1 Tablespoon water

½ to 1 cup of canola oil

Jar of your favorite spaghetti sauce
2 cups shredded Mozzarella cheese
½ cup fresh chopped parsley

Directions:
Preheat oven to 350°.  Rinse chicken breasts and pat dry with a paper towel.  Trim off any fat or skin that remains on the chicken breasts.  If they are large, halve them and consider partially flattening the thicker portions with a meat-tenderizing hammer.

When the chicken is ready, heat canola oil in a skillet or electric frying pan.  The oil should be approximately ½” deep.  You can tell when the oil is hot enough by dropping a couple of breadcrumbs into it.  If they sizzle, the oil is ready.  Beat the two eggs with one Tablespoon of water.  Dip each piece of chicken in the egg and coat with the breadcrumb mixture.  

Place in the oil, topside down first, carefully positioning so that there is room for all pieces.  (You only want to move the chicken once; when you turn it.)  

Cook chicken for about 4-5 minutes on each side, or until golden brown.  If chicken sticks, you probably put it in oil that wasn’t hot enough.  Quelli guardare bene!

When both sides have cooked, remove the chicken to paper towel lined plates to drain.  

Coat the bottom of a large baking dish or lasagna pan with spaghetti sauce, about ½“ deep.  Position the chicken in the dish and place in oven for 20-30 minutes, or until internal temperature reaches 165°.  The chicken will continue to brown in the oven.

When the chicken is done, remove it from the oven and top with shredded Mozzarella cheese and chopped parsley.  Return to oven until the cheese is just melted.

I almost forgot!  Now for the "Really Easy" Chicken Parmesan.  Buy chicken cutlets that are already breaded and cooked or partially cooked.  Simply  place them in the sauce and heat them according to package directions and then top with Mozzarella and serve.

Molto Buon!

Saturday, January 21, 2012

Mac-and-Cheese-Style Cauliflower


Any parent worth their salt tries to get their kids to eat more vegetables.  Even before the institution of parenthood had a clearer understanding of the actual benefits of increased vegetables, parents did this.  Was it just intuitive, or was there a sadistic side to those uninformed parents?  Perhaps we’ll never know.

My brother Brad and I were just talking about his being forced to eat Brussels sprouts as a kid.  He told Mom and Dad that he would throw up if he ate them.  Subsequently, Brad was told that he would sit at the table until he ate them.  The scene was set for the quintessential Mexican standoff.  The minutes clicked by.  After almost an hour, Brad yielded to their final demand of “just one.”  He ate it and his prophecy, shall we say, came true…right on the kitchen table.

I just heard on the radio that children have stronger bitter receptors in their taste buds than do adults.  I’m not sure about that.  My theory is that our taste buds are just glazed-over with everything we’ve thrown down our pie holes.  Or maybe it’s that we’ve learned to suppress our gag reflex.  More research is needed.

Many parents try to hide vegetables in other food.  You’ll recall my chili with hidden zucchini recipe.  Fellow blogger RofoMom hides cauliflower in her mashed potatoes.  And my mother made “golden mashed” with hidden cooked carrots.  Every parent has a trick or a technique.

I was less creative.  For my kids, the secret seemed to be:  cheese sauce.  Granted, I probably canceled out any benefit brought to the table by the veggies, which ended up gasping for breath under the weight of that melted fromage.  To make matters worse, (please don’t hate me), I used Cheese Whiz…a product name that always made us Willauer boys laugh.

The other day in the doctor’s office, I picked up a copy of Vegetarian Times.  Now I am anything but a vegetarian, although I’ve cut down significantly on red meat.  It was the cover photo that caught my eye:  Mac-and-Cheese-Style Cauliflower.  I already love cauliflower.  Steam it and add a little sea salt and I’m good, but this looked magnificent.

The original recipe called for a half cup of nutritional yeast.  What the heck is that??  I did a little research and it looks like it’s pretty good stuff.  It’s described as having a nutty, cheesy flavor and can be sprinkled on popcorn or garlic bread…not to mention that it’s the only reliable food source for vitamin B12.  I’ll have to get some.  In the meantime, I substituted a half cup of sour cream and reduced the amount of water.  Give this recipe a try.  It starts out as any cheese sauce worth it weight does, with a simple white sauce.

MAC-AND-CHEESE-STYLE CAULIFLOWER

Photo credit: Vegetarian Times
Ingredients:
1 large head cauliflower, cut into medium florets
2 Tablespoons butter
3 Tablespoons all-purpose flour
2 cups milk
1 clove garlic, minced (1 teaspoon)
2 cups grated extra-sharp Cheddar cheese, reserve one handful
½ cup sour cream
1 pinch cayenne pepper
2 egg yolks
1½ cups breadcrumbs
½ cup reserved liquid from cooking cauliflower

Directions:
Preheat oven to 350°.  Bring a large pot of salted water to a boil.  Add cauliflower florets and boil for about 5 minutes.  The florets should be just tender.  Do not overcook.  You don't want them to be mushy.  Reserve ½ cup of liquid and then drain.

Melt the butter in the bottom of a saucepan over medium heat.  Whisk in flour until smooth, cooking for approximately one minute.  Next whisk in the milk, garlic, and reserved cooking liquid.  Increase heat to medium high and whisk constantly until sauce is thickened.  Remove from heat as soon as thickening occurs and stir in cheese, sour cream, cayenne pepper and egg yolks.  Stir until cheese is melted.

Grease a 9’x13” baking dish or spray with non-stick cooking spray.  I’ve started to use a Misto® Gourmet Olive Oil sprayer instead of non-stick cooking spray.  The commercial non-stick sprays have a propellant that is not easily removed from cookware.  Arrange cauliflower in bottom and pour cheese sauce evenly over it.  Sprinkle the top with the breadcrumbs, topping that with the remaining shredded Cheddar cheese.  After comparing my result with the Vegetarian Times picture, I decided to sprinkle the casserole with a little cheese the next time I make it.  Spray the breadcrumb topping with olive oil, (or non-stick cooking spray).

Bake for 30 minutes or until the casserole is hot and bubbly and breadcrumbs are crisp and brown.

Click here for the original recipe from Vegetarian Times

Enjoy!

Sunday, January 15, 2012

Two Cakes: As Easy as Pie!


Lemon Poppy Seed Pound Cake
Sometimes you’ve just got to go easy.  The lives we lead, (and the schedules we keep), at this point in time would undoubtedly make the heads of our forbearers swim.  That level of intense busyness seems to be an East Coast phenomenon, in case you’ve haven’t noticed or been told.  I’m not saying it’s right or wrong, but now that I’m retired, I’ve made two, less-than-astute observations:  1.  It sure is nice to not have every minute programmed, and 2.  Breaking the perpetual motion habit is hard to do.

Someone once told me that our basic work ethics continue after retirement, and that certainly seems true in my case.  The saying you’ve heard other retirees utter:  “I don’t know how I had time to work!” is true.  I really think I’m busier in retirement than I was when working.  I’m not sure how that is possible.  As a full-time elementary principal and a part-time pastor, my “dance card” was always filled to overflowing.  For me it most likely has a lot to do with the fact that I now have minimal stress.  I’m also not eternally exhausted.  Then again, I was happy when I was working, and I’m happy being retired.

Orange Pound Cake
All of that to say this week that it’s okay to use a box cake mix!  There is no shame in using one, especially when you just don’t have the time.  Actually, I’m hard pressed to find a better scratch brownie recipe than Duncan Hines, and with this week’s two cake recipes, if you follow my ‘embellishments” no one is going to know.  Both cakes, and their icing, (a glaze, really), are as simple as you can get.  Like I said, “As easy as pie!”

Credit:  Broadcast Pioneers of Philadelphia Archives
My embellishments are inspired by long-time local cooking show host, Florence P. Hanford.  Television Kitchen was one of the country’s first cooking shows, and I remember it being sponsored by Philadelphia Electric Company.  In the accompanying picture, you can see Reddy Kilowatt, the company's mascot.

Credit:  Broadcast Pioneers of Philadelphia Archives
The show always started with close-ups of simmering pots.  The lids would be lifted to reveal the show’s opening credits.  I was captivated.  If I was at home on Wednesdays at 2:30, I would pull up a chair and watch Florence cook.

Florence Hanford died in 2008 at the age of 99, but about a year before, my Aunt Frankie sent me a newspaper clipping of an interview with Hanford.  The article noted that Florence served the reporter Snicker Doodle cookies.  But get this:  They had been made with store-bought refrigerated sugar cookie dough that had been dipped in cinnamon and sugar.  If it’s good enough for Florence P. Hanford, it’s good enough for me!  You can read more about Florence P. Hanford and Television Kitchen at the Broadcast Pioneers of Philadelphia website.

LEMON POPPY SEED POUND CAKE


Ingredients:
1 box lemon cake mix
1 pkg. instant lemon pudding/pie filling
½ cup oil (I generally use canola oil)
1 cup cold water
4 eggs
2 Tablespoons poppy seeds

For the glaze:
1 cup confectioners sugar
2 Tablespoons fresh lemon juice
½ teaspoon lemon zest

Directions:

Blend all ingredients with a mixer, beating 2-3 minutes.  Place batter in a greased and lightly floured tube pan or deep Bundt pan, and bake at 350° for 45-50 minutes.  The cake is done when the top springs back when lightly touched.

Cool the cake, right-side-up for 25 minutes, then invert on your serving plate.  Allow the cake to completely cool before glazing.

Blend the icing ingredients in a small bowl and drizzle over the cake.


NOTE:  Do not mix the cake batter for more than three minutes!  I’ve made this cake about a dozen times and the last time I made it left the mixer run for about ten minutes.  After it had been in the oven for about 20 minutes, I was amazed to see smoke coming from the oven.  This was what I found on the bottom of the oven:

The cake had expanded beyond its “borders” and the batter was coming through the tube in the center of the pan!  By the way, this “oven muffin” was just as tasty as the cake…except for the burnt parts.

ORANGE POUND CAKE


Ingredients:
1 box orange cake mix
1 pkg. lemon instant pudding/pie filling
½ cup oil ( I generally use canola oil)
1 cup cold water
4 eggs

For the glaze:
1 cup confectioner’s sugar
½ teaspoon orange extract
5½  teaspoons water or orange juice
½ teaspoon orange zest

Directions:
(Same as the first cake)  Blend all ingredients with a mixer, beating 2-3 minutes.  Place batter in a greased and lightly floured tube pan or deep Bundt pan, and bake at 350° for 45-50 minutes.  The cake is done when the top springs back when lightly touched.

Cool the cake, right-side-up for 25 minutes, then invert on your serving plate.  Allow the cake to completely cool before glazing.

Blend the icing ingredients in a small bowl and drizzle over the cake.

Enjoy!

Sunday, January 8, 2012

Two Soups: The Good, the Bad, (and Both Yummy!)


I was all set to start this blog:  “Well, it’s finally soup weather…”  And Saturday’s high temperature was in the mid-sixties!  This has been a crazy winter.  The sheep are still contentedly browsing out in the pasture.  I’ve never waited to start feeding them hay this late.  It’s been an unseasonably warm winter…so far.  Who know what lies around the corner?  Just in case, be prepared with these two soup recipes.

I love soup, both making it and eating it.  More often than not when I go out to eat, I’ll have a cup of soup with my meal.  And there’s nothing quite like filling up a house with the delicious aroma of soup on the stove.

You can decide which recipe is “The Good” and which one is “The Bad.”  Actually, depending on your perspective, it could flip-flop.  While they’re both made from fresh ingredients, there is probably no debate which one is better for you, at least calorie-wise.  However, if you were to eat them each every day for a week, (and I have), one will become “The Bad” more quickly than the other.  It’s interesting, because the first spoonful of either one is so delicious.  I suppose our taste buds can be put to sleep with any food, no matter how sublime.

My daughter Lauren loves my Potato Chowder.  She’s had a hankerin’ for it since October.  I’ve tried to tell her, “If you want to make good soup, you have to be in the mood.”  The mild weather wasn’t doing anything to motivate me.  But she recently forced my hand, telling us two weeks before Christmas that she and Dan are expecting.  She’s going to be a momma!  So it’s time to make the soup, because if Momma ain’t happy, ain’t nobody happy!

POTATO CHOWDER
(click on any image to enlarge it)

Ingredients:
4 cups peeled, cubed potatoes
½ cup finely chopped onions
1 cup grated carrots
1 tsp. Salt
¼ tsp. Pepper
2 Tbsp. Dried parsley flakes (or ½ c. fresh, chopped)
4 chicken bouillon cubes (Knorr’s preferred)
6 cups scalded milk
4 Tbsp. Butter
½ cup flour

Directions:
Many people dislike cooking due to all of the prep work.  Most of us don't have a sous chef to fall back on.  It's kind of like being an elementary principal; when you turn around, there's no one there to delegate to.  So, cubing potatoes to make chowder can be a little tedious.

But wait!  Why not use a vintage 1940's Becky Porter French Fry Cutter?  This is the kitchen machine that was used in the restaurant that operated at Latshaw's Bakery in Spring City, PA.  It was primarily a seafood restaurant, and of course French fries were included with every offering.

Check this out.  You simply make your potatoes into raw fries...

...and then make several perpendicular cuts, and voila!  You have a pile of cubed potatoes!

Add water to potatoes and onion until they are just covered.  I had a little chicken stock left over from another recipe and included that when I added the water.

Add the grated carrots, salt, pepper, parsley and bouillon as soon as you start to heat, and mix everything well.  Cook the vegetables for 15-20 minutes.  Stir several times while cooking.  Add the butter when there are approximately 5 minutes left to cook.

The potatoes will actually started to break down as they cook, helping to thicken the chowder.  Check out the difference that 15 minutes can make:


While the vegetables are cooking, begin heating the milk in a separate pot to 180°, (or if you don’t have a thermometer, until small bubbles form at edges of pot.)

It really is true.  I used a digital thermometer, and no sooner did the temperature reach 180° than tiny bubbles started to form around the edge of the saucepan.  Set aside 1½ cups of scalded milk and thicken it with the flour.  Stir until well-blended using a whisk or electric hand blender.  Stir the thickened milk mixture into the undrained cooked vegetables.  If everything is hot, the soup should noticeably thicken almost immediately.  Add the remaining unthickened milk, and stir well.

Simmer 15 minutes more on low heat, making sure the chowder doesn’t boil.  Serves 8.  You can also thicken the scalded milk with corn starch.  Use a little less than ¼ cup.

Variations include adding chopped celery and sliced or diced mushrooms.  Diced clams or ham can be added to make other variations, as well as cooked and crumbled sausage.

The next soup recipe is one given to me by Royersford Elementary cafeteria manager Nancy Ruoff.  It’s a great soup, good for you, has zero WW points, and is easy to make!

WEIGHT WATCHERS ZERO POINT
GARDEN VEGETABLE SOUP

Ingredients:
2/3 cup sliced carrots
½ cup diced onion
2 garlic cloves, minced
3 cups broth (beef, chicken, or vegetable)
1½ cups diced green cabbage
½ cup green beans
1 Tablespoon tomato paste
½ teaspoon dried basil
¼ teaspoon dried oregano
¼ teaspoon salt
½ cup diced zucchini

Directions:
In a large saucepan, sprayed with nonstick cooking spray, sauté carrots, onion, and garlic over low heat until softened, about 5-10 minutes.  Add the broth, cabbage, beans, tomato paste, basil, oregano, and salt.  Bring to a boil.  Lower heat and simmer, covered, about 15 minutes or until beans are tender.  Stir in the zucchini and heat for an additional 3-4 minutes.  Serve hot.

This makes about four 1-cup servings, and each provides 0 Weight Water points.

Enjoy!