Friday, April 27, 2012

A Smoo-o-o-o-th Return to Royersford Elementary


Group One  (*Photo credits, see below)
Click on any image to enlarge it
What I had previously suspected was confirmed today.  What I most miss about being an elementary principal is the kids.  Not only that, but everyone should have a place where they're treated like a rock star.

Today was Career Day for the third and fourth graders at the borough school where I was principal for twenty-five years before retiring in 2010.  Guidance counselor, Ginny Prevost, has organized an annual Career Day for about ten years at the school.  Community members, including many moms and dads, come into the classrooms to share information about their occupations.  It’s a great chance to widen the horizons of the boys and girls, many of whom up until this point have limited their future aspirations to being a fireman or a professional athlete.

Cassandra was was first chef-assistant
I was invited back not as a retired principal, or even as a pastor, but as a cooking blogger, which by the way, has yet to provide me with any financial gain.  However, if the ideal job is one you would do for free, then blogging about cooking is for me.  My dad was a baker, so the cooking part is understandable.  Many people do not know that my mother, Gladys was a correspondent for The Pottstown Mercury for more than thirty years.  That would account for the journalistic side of food blogging.

"The moment of truth"
I shared my year-long experience of starting a cooking blog with the children, projecting my blog onto a screen in the classroom and introducing them to some of the statistics that are provided to assist you with tailoring your blog to your audience.  I also told them about related blog experiences such as learning about food photography and taking the food safety certification course, (the certificate for which arrived in the mail on the day I returned home from Career Day!)

Look at that smile as the honey goes in!
After my spiel about blogging, the real fun began.  I referred to a blog post from last summer entitled, "Refreshing Summer Beverages,” and announced that we would be making smoothies.  Not just any smoothies, mind you.  The children in each group would be inventing the recipes that I would include in this post.  (The excitement and enthusiasm in the room was palpable!)

Group Two - More happy "customers"

Madison was chef-for-a-day #2
I selected a helper from each group, outfitted them with the proper “chef gear,” and put them to work.  There was only one momentary lag when one third grader told me she wasn’t allowed to use a knife.  My host, fourth grade teacher Mrs. Laura Clark fortunately had a plastic one in her pocketbook!  (What ever happened to zero tolerance?)


After reviewing the ingredients that I had on hand, each group selected a fresh fruit item, a frozen fruit, and a liquid.  After initial blending with some ice cubes, the moment of truth came:  The Taste Test.  Was it sweet enough?

Chef Marissa's group (#3) added Cool Whip to their ingredients


To no surprise, each groups “chef-for-a-day” indicated that more sweetness was needed, (as any self-respecting elementary student would), and honey or agave was added.  Everyone then got to share in tasting their group’s creation.  Passing out a recipe sheet and business cards with the There’s a Dad in the Kitchen web address on them, rounded out the presentation.  All that in a half hour.  Yes!  Nailed it…and not once, but three times.  I still had it!

A little extra "help" in the form of some agave syrup
It was so good to be “back in the saddle” where I spent a total of thirty-five years teaching and “principaling.”  Some people asked me if it “felt weird.”  My response?  It was just like riding a bike.  In fact, it would have felt weird not to have returned.

Group Three
Here are the three on-the-spot-invented recipes by the students of Royersford Elementary School.  Basic smoothie directions follow all three ingredient lists.  All ingredients are estimated.  (It’s pretty hard to wreck a smoothie!)  Try them, you’ll like them…and experiment with your own!


RES CAREER DAY SMOOTHIE RECIPES


Group One – “Kiwi Strawberry-Banana Smoothie”
Ingredients:
½ banana, sliced
1 kiwi, peeled and sliced
3-5 strawberries, cored and halved
¾ cup of milk
1½ cups ice cubes (approx.)
2-3 Tablespoons honey

Group Two – “Cranberry Fruit Shake”
Ingredients:
½ banana
½ cup red raspberries
1 cup cranberry juice
1 cup Cool Whip®
2 Tablespoons agave (sweetener)
1½ cups ice cubes (approx.)
¼ cup cold water

Group Three – “Very Berry Smoothie”
Ingredients:
3-4 strawberries, cored and halved
½ cup frozen blueberries
½ cup frozen red raspberries
¾ - 1 cup orange juice
1 cup Cool Whip®
2 Tablespoons agave (sweetener)
1-2 cups ice cubes


Basic Smoothie directions:

  1. Add the liquid you’re using to the blender first
  2. Add the fresh and frozen fruit and blend
  3. Add any Cool Whip®, yogurt, or ice cream and the ice cubes, blending until the ice cubes are “pulverized”
  4. If mixture is too thick (to even blend fully), add some more liquid or water.  You may have to turn off the blender, stir with a spatula, and blend some more.

Enjoy!

*All photos taken by Mrs. Laura Clark and Mrs. Dina Preston, fourth grade teachers at Royersford Elementary School

Sunday, April 22, 2012

Plain & Simple Beef Stew


“It’s time to go down into the cave house and get some potatoes, carrots and other root vegetables and make a beef stew.”

That’s a statement that you don’t hear too often today.  Not many root cellars survive today and most people have no idea what one is.  A large root cellar was a part of the Latshaw Farm on Wall Street in Spring City.  Aunt Sara and Uncle Russell always referred to it as the “cave house.”  In their backyard was a mound of earth with two terracotta pipes protruding from the top.  If you shouted down those pipes you could make all kinds of echo-ey ghoulish sounds.  It was great fun to take an unsuspecting cousin and have them listen for the “monster” at one pipe while you provided the sound effects at the other.

The cave house was accessed through an adjacent shed.  Behind a wooden door was a full flight of stairs taking you down into the earth.  A single clear incandescent light bulb illuminated the storage room at the bottom of the steps.  It was a tubular dome-shaped room with a concrete floor and plastered walls and ceiling.  The walls were lined with wooden benches upon which were peach baskets of potatoes, apples, turnips as well as any other fall-harvested vegetables that kept well in the constant 54° temperature.  It was a great place to explore on a hot summer afternoon.

Beef was one of Aunt Sara’s favorite foods.  Family dinners she hosted almost always included beef as the main course.  Each year, she would have a steer butchered and the labeled packages wrapped in white butcher paper would be stacked in her chest freezer.  The beef she served was always tender, moist, and flavorful.

This version of beef stew is a compilation of a number of recipes I’ve used over the years, and is probably one of the simplest to prepare.  It’s not a dish that you can have on the table in 20 minutes.  While the actual prep and hands-on cooking time takes less than 20 minutes, allowing beef stew to simmer for a couple of hours will make all the difference.

BEEF STEW
(click on any image to enlarge it)

Ingredients:
1½ - 2 lbs. stew beef
1-2 Tablespoons cooking oil (olive, grape seed, or canola)
2 medium onions, chopped
1/3 cup all-purpose flour
½ teaspoon Kosher salt (add more, to taste)
¼ teaspoon ground black pepper (add more, to taste)
1 teaspoon dried basil
½ teaspoon dried rosemary leaves
3 bay leaves
2 Tablespoons dried parsley flakes
5 fresh plum tomatoes, peeled, de-seeded, & chopped, or 2 cans diced tomatoes
5 large carrots, peeled, cut in 1” to 1½” pieces
6 medium potatoes, peeled, cut into 1½” to 2” pieces
2 cans sliced mushrooms
3 cans beef broth (approx. 46 oz.)

Directions:
Begin to brown the beef cubes in the oil over medium heat.

Chop the onions and add to the beef, along with the salt and pepper.

When the onions begin to soften and the beef has mostly browned, add the flour and incorporate it until it is moistened and fairly smooth.  Most of it will stick to the beef cubes.

Add the beef broth and diced tomatoes and bring up to a simmer, (just below a boil).  Allowing the stew to simmer for two hours will allow the flavors to blend and will tenderize the meat.

Prepare the potatoes and carrots by peeling and cutting them into larger, stew-size chunks.  Add them to the stew when ready, along with the remaining ingredients.  Stir occasionally, and as the liquid evaporates, add water to maintain the original level.  Keep the pot covered will slow evaporation.

Crusty bread with butter is a great complement to a one-pot meal like beef stew.  I’d be interested to hear about your favorite beef stew recipes.  Send them to me at drwillauer@gmail.com.

Enjoy!

Tuesday, April 17, 2012

I'm Certified! Taking the ServSafe Food Safety Course


I said, “I’m certified,” not, “I’m certifiable!”

You’d think that educators would love learning; that they would anticipate and just quiver all over for any chance to get into a classroom and learn.  Such is not the case.  Trust me.  I know from experience that educators make some of the most challenging students on the face of the planet.  Most would rather teach than be taught.

And yet…continuing education is required of all who work in education, (as it should be).  Everyone from superintendents to classroom assistants are responsible for keeping “up” with the latest trends, techniques, and methods.  It’s just that we make horrible students.  As a whole, we’re critical, and we get easily bored.  We’re also absolutely atrocious at following directions.  Sad, but true.

After I earned my Masters degree from West Chester University, I decided to take some time off.  It was short-lived.  For most teachers there are only two ways to earn more money.  One is to gain experience.  The longer you’ve been teaching the higher step you reach on the salary scale.  The other way is to increase your level of education.  After earning a Masters degree, you can continue to advance up to and including 30 additional post-graduate credits.  As I was helping to support a young family, it was back to the classroom for me, (in addition to holding down summer jobs during the years I was in the classroom).

After earning thirty additional credits, I decided to take a break.  It was short-lived.  Many colleagues were encouraging me to become a principal; not something I had any desire to do.  Idealistic as it may sound, I really had to convince myself that I would make more of a positive impact on kids as an administrator than I would if I stayed in the classroom.

It was back to the classroom for me at the University of Pennsylvania to earn my principal’s certification.

One day, shortly after starting as principal at Royersford Elementary, I was receiving an annual performance review from Dr. Edwin Coyle, then superintendent at Spring-Ford.  “I’d like you to go back for your doctorate,” he told me.

“Why should I do that?” I asked.

“In case you ever have the opportunity for a central office position,” was his reasoning.

“Don’t take this personally, Dr. Coyle,” I said, without totally thinking about what I was saying, “but I don’t want to be like you.”

He took it well.  What I meant was that I knew that I was exactly where I was supposed to be.  “Progressing” beyond being a principal was not in my plans, and being assigned to the central office certainly wasn’t in my blood.  I would have “died” without daily contact with students, and for twenty-five years proudly served as principal of Royersford Elementary School.  Even though I retired only two years ago, it seems like a lifetime since I “administered.,” but it was my current interests and endeavors that recently took me back to the classroom.

As I write blog posts, I certainly don’t want to mislead or misinform, and now that I’m cooking more frequently for groups at Parker Ford Church, I want to make certain that food safety is a top priority.

Credit:  ServSafe Essentials, National

Restaurant Association © 2008, 2010
There’s no recipe this week, but I would like to tell you about the food safety course that I completed.  It’s called the ServSafe Food Safety Manager’s Certification course and it’s offered at community colleges in the area.  It’s also offered by Paster Training, Inc. which is located in Gilbertsville, Pennsylvania.  I registered online and a book for the course was shipped directly to me within two days.  Food safety certification requires sixteen hours of training.  The first eight result from completion of the course manual.  The second eight hours accrue as a result of a day-long classroom experience.  The day in the training course culminates in taking a 90 question multiple choice examination.  75% is the minimum required to earn certification, although someone at the church told me that he didn’t want anyone cooking for him who only earned a 75%!  I earned a 97% missing items under the Foods and the Facilities categories.  The remaining eight question categories were all 100%’s.

I have to tell you that if you’re squeamish, don’t take the course.  The section on food borne pathogens is disconcerting and sobering.  Everyone in the course had second thoughts about where they ate lunch during the class’s midday break.

I do want to pass several areas of importance onto you.  First, get a kitchen thermometer.  They are inexpensive and very necessary if you want the food you prepare to be as safe as possible.  The first use of a thermometer is to determine doneness when cooking meat.  It helps to avoid over-cooking.  More importantly, use the thermometer to keep food safe.  There is a minimum temperature which should be reached when cooking meats.  (See chart at end of post.)  When serving or holding food, cold items should be kept at 41°F or colder.  Hot food should be kept at 135°F or hotter.  If you have to serve food without accommodations to chill cold items or heat hot food choices, you can safely allow cold food to sit for four hours, or six hours for hot food.  Before reaching those time constraints, either reheat (or re-chill) the food or throw it out.  Reheating something?  Heat it to 165°.  In an upcoming post, I’ll tell you about the importance of proper chilling of food after cooking/serving when you’re getting ready to store it.

Credit:  ServSafe Essentials, National Restaurant
Association, © 2008, 2010 
Another emphasis of the course was the importance of hand washing.  Doing so prevents cross-contamination, (raw meat to ready-to-eat food, for example), and also prevents the spread of germs and illness.  It is important to use hot water with soap and scrub your hands for a minimum of 15-20 seconds, drying them with a single-use paper towel.  Get a load of this:  We learned that anti-bacterial washes aren’t that much more effective than good old hand washing.  Most say they kill 99.9% of germs, but there are so many billions of germs that the .1% is still pretty formidable.  (.1% of one billion is a million, for Pete’s sake!)  And with that happy thought, I’ll leave you.  I’ll have a (safe) recipe for you next week!

Enjoy!


Click to enlarge:
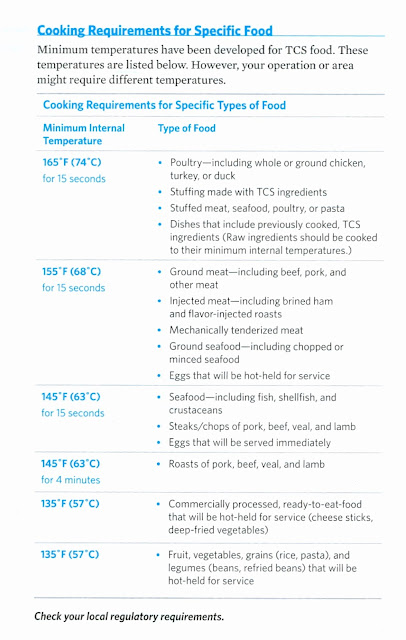
Click to enlarge.  Credit:  ServSafe Essentials, National Restaurant Association,  © 2008, 2010

Wednesday, April 4, 2012

Mom's Peanut Butter Easter Eggs


We could count on the homemade peanut butter Easter eggs every year.  Just like clockwork, a one-pound white cardboard box of melt-in-your-mouth goodness appeared for each member of the family.  Everyone got their own, with their name written in the upper right-hand corner.  My mother-in-law, Rosemary Lebegern, made sure that everyone was treated equally, and may God save your soul if you “borrowed” any from someone else’s box.

For the first time since “Mom” passed away in 2007, I got her recipe out and read it.  Not only did she provide the recipe for peanut butter eggs, but also butter cream and peanut butter “krackle” eggs, made with Rice Krispies. 

On the back of the card are directions for making the chocolate coating.  Rosemary indicated that she bought the necessary chocolate wafers at Edwards Freeman Nut Company in Conshohocken, indicating that the chocolate was already tempered and that adding paraffin was also not needed.  In typical “Mom” fashion, she added a note, “Ask them if you have any questions.  They will tell you.”

Edwards-Freeman Nut Company
Edwards Freeman Nut Company is worth the drive.  A visit is like going back in time.  Located at 441 East Hector Street in Conshohocken, Pennsylvania, the store’s interior is lined with shelves with cubbies that are filled with every type of candy you can imagine.  

A fraction of what you'll find.
The candy you’ll find ranges from old-fashioned favorites right up through the most recent candy fads.  They even have candy-coated insects!  

Candy-coated insects!
The Easter candy was out in full force and I had no trouble finding family favorites as well as some new items to try.  Mercken’s Chocolate Wafers, for melting and dipping the peanut butter eggs, were featured prominently, and I bought 3 lbs.  Until all was said and done, I spent more than $80.  I even bought some bottles of hot sauce.  (As your kids get older, what goes into their Easter baskets gets revised.)

I was glad that I didn’t have to add wax to the chocolate to make the coating.  Something just seems wrong about that.  When I was recently in another store, I overheard two women talking about adding paraffin to chocolate.  I’m guessing it has something to do with making the chocolate less likely to melt in your hands.  The one woman’s son saw the wax going in and he hasn’t eaten a peanut butter egg since.  (If only that would work in my house!)

MOM’S PEANUT BUTTER EASTER EGGS

Ingredients:
1 cup butter (2 sticks)
1¼ cups peanut butter
1 lb. confectioner’s sugar

For chocolate:
1 lb. tempered chocolate wafers (I used Mercken’s)

Directions:
Heat the butter in a saucepan over medium low heat until melted.  Add in the peanut butter.  Make certain that you measure the peanut butter by volume.  It is often sold by weight.  Stir until smooth, then remove from heat.  At this point, I found it helpful to transfer the mixture to a large bowl, but if your saucepan is large enough you can add the sugar without using a bowl.

Add the sugar about one-fourth at a time and incorporate it completely.  Use a wooden spoon at first.  As the mixture cools, you can knead it with your hands.  Cool the mixture for at least one hour in the refrigerator.

To melt the chocolate wafers, place them in a microwaveable glass bowl and heat on high power for one minute.  Stir.  Heat for an additional minute.  If all of the wafers are not fully melted, continue microwaving 20 seconds at a time.

Begin to form “eggs” from the peanut butter mixture.  The size and shape is your choice.  My mother-in-law’s eggs were always uniform in size and shape.  I started with smaller, rounder shapes and they morphed into flattened peanut butter balls.  A little experimenting is probably in order.  Try to form the eggs quickly so that the heat from your hands doesn’t soften the “eggs” too much.  If the eggs are too soft they will change shape.  You also want the surface to be a smooth as possible.

Rather than dip the peanut butter eggs directly into the melted chocolate, coat your fork with chocolate, then place an “egg” on the fork.  Use a spoon to ladle the chocolate over the egg until covered.  Gently tap the fork on the edge of the bowl.  This will speed the dripping of the chocolate and evenly distribute the chocolate coating.


Not exactly "pretty," (I'm learning), but really good!
Scrape the bottom of the fork on the edge of the bowl and gingerly transfer the coated egg to a tray lined with waxed paper.  The weight of the egg and the “lubrication” from the chocolate should allow the egg to gracefully slide onto the waxed paper.  This takes a little practice and no small amount of finessing.

Candy makers use a special two-tined fork that has wire-like tines.  Another trick is to use a plastic fork with the middle tines removed.  (I didn’t figure this out until after my first batch.)

Allow chocolate to harden and store in covered containers in a cool place.  Finished peanut butter eggs can be refrigerated or frozen, and they keep well.  But if your house is like mine…not for long!

Enjoy, and have a blessed Easter.  He is risen!

Sunday, April 1, 2012

Family Recipe Earns Dad in Kitchen a Tidy Sum


Most recipes are faded and some are illegible.
Who doesn’t remember making a salt and flour map when they were in school?  I remember both of mine very well.  One was a map of Iceland and the other was of Italy.  The great thing about a salt and flour map is that they look so realistic.  You can sculpt the coastline and form mountains and river valleys that look just like the real thing.  Forget the fact that your map isn’t accurate.  Most weren’t, but they passed.  Let’s face it, when you’re making the map; a glob here and a plop there; it all looks good, so why move it?

And how about durable?  Almost all salt and flour maps survived the school bus trips to and from the schoolhouse…because they were as hard as rocks.  They were rocks!  Some can still be found in attics, years after their creation.  It was the high concentration of table salt that preserved them, from mold as well as from rodents.  What mouse in his right mind would bite into anything that is two parts flour to one part salt?

When I made my salt and flour maps in fifth and seventh grades, little did I know that my great-grandfather was responsible for innovating the use of German Salt Dough for topographic or relief map construction for school projects.


The cover is encrusted with flour and
many pages have shortening stains.
It started about seven months ago when I found my great-grandfather’s recipe book.  Hosea E. Latshaw was born about the time of the Civil War and had started Latshaw’s Bakery in Spring City, Pennsylvania by 1882.  By the time he was born, at least four generations of Latshaws had resided in the United States.  It’s unclear where Hosea’s recipes came from, but many include German references.

One such recipe is “Salzteig.”  When I first read the ingredients, (2 qt. flour, 1 qt. salt, 2 jiggers weinstein, 1 qt. water), I wondered, “Who in their right mind would want to eat that?  And what in the world is ‘weinstein?’”

I then did a little research.  “Good old” Alta Vista Babelfish translated “Salzteig” as “salt dough.”  More Internet research revealed that salt dough was originally used to make decorative sculptures, as far back as Ancient Egypt.  The high salt content really served as a preservative.  Germans used the mixture to make Christmas ornaments and other holiday decorations.

But what is “weinstein?”  After more Internet research I learned that weinstein is the white residue that forms on the inside of casks of wine when it ages.  It’s actually potassium tartrate and it’s left to dry, scraped off, and used in cooking.  You might know it as cream of tartar.

Someone made a LOT of salt dough ornaments!
All of this would explain the old photo I found of what I surmise are salt dough Christmas decorations.  The larger items in the foreground are wall hangings of some kind, but the garland creating the booth is dripping with Christmas ornaments.  Most are wreaths.  If you look closely, you’ll recognized the Holy Family is the subject of the picture hanging in the center.

Someone in the Latshaw family obviously made a ton of salt dough Christmas ornaments.  That is interesting, but here is the unique part.  At the bottom of the page with the Salzteig ingredients in Hosea’s recipe book, is this notation:  Russell - China map for school.

Russell Latshaw with one of the
horses used to pull the bakery
delivery wagon.
Russell Latshaw was Hosea’s oldest child, born in 1895.  He did not graduate from high school, as he was needed in the bakery and to work on the family farm on Wall Street, also in Spring City.  However he did finish the sixth grade.  Could it be that Russell made a map of China from the Salzteig?  I suddenly became interested in the history of salt and flour maps.

After many hours on the Internet, as well as chasing down many false leads and bad information, I received a reply email from Amy Nibbet of the Smithsonian Institution.  Amy is a conservationist with the Smithsonian’s Donald Rockwell Research Center for the History of American Education.  Amy told me that the first mention of salt dough maps is in 1911 in a school annual, the forerunner of the yearbook.  The location was even more important:  Phoenixville, Pennsylvania.  After 1911, the recipe for salt dough map making appears in educational periodicals and teaching books.

Here’s the best part:  Amy told me that an “H. Latschar” had registered the recipe’s use for map-making and that royalties had been paid whenever it was published for twenty years, the term of the registration.  Due to the spelling error, the money was never paid to Hosea, and a law firm in New York City has held the royalties since 1913…with interest.  The original amount was only slightly over $7,000, but with interest averaging 4.5% the total is now almost $612,000!  Since I am the holder of the original recipe, which must still be tested for authenticity, I will be able to claim the entire amount.  And if you believe that, don’t forget it’s April Fool’s Day!